Archiv der Kategorie: Cryptocoins

Krypto Fiat Gateways

Ab und zu werde ich gefragt, wie man unbürokratisch zu Kryptowährungen kommt. Zum Beispiel wenn man in die Welt der NFTs einsteigen möchte und daher schnell „etwas“ braucht. Für Kleinbeträge lautet die Antwort: Krypto-Fiat-Gateways ohne KYC.
Mit diesen Gateways kann man Fiat-Geld (z.B. €) leicht und schnell in Kryptowährungen umwandeln, auch umgekehrt.

Erstes Beispiel (mit dem ich selbst schon mehrere Transaktionen erfolgreich abgewickelt habe) ist Mt. Pelerin. Ein Schweizer Unternehmen, das natürlich alle gesetzlichen Vorgaben erfüllt – siehe Infos auf deren Homepage. Das Limit beträgt umgerechnet CHF 1000,- pro Tag (ohne KYC) bzw. € 200,- pro Kreditkartentransaktion (Stand 9.5.2022).
Da die Liste der Blockchains und dort jeweils verfügbaren Währungen lange ist und man leicht die Übersicht verliert, habe ich ein paar gängige Kombinationen erstellt und hier verlinkt.

Und bevor die Frage kommt: Nein, ich bekomme keine Provision von Mt. Pelerin 😉

Wenn es mal mehr als ein Kleinbetrag sein soll, dann verwende ich fast immer das österreichische Fintech Bitpanda. Nach einer ordnungsgemäßen KYC Prüfung hat man dort extrem viele Services im Kryptobereich und darüber hinaus zur Vergfügung.

Blue Skies NFT (english)

(deutsche Version hier)

Recently, I have been asked more and more often whether I (in my role as a blockchain consultant) can also „make“ NFTs. I already created a few NFTs on OpenSea and mintable.app a long time ago and know the advantages, but also the disadvantages of such platforms. So now it was time to make „real“ NFTs. By that I mean NFTs with their own smart contract, where you can control everything yourself and also add special functions.

Since I’m not an artist, my first question to myself was, „So for which usecase?“ I decided on „give-away“ NFTs that I can give to my clients, partners and friends. Most of them, however, are not extremely crypto-savvy. All the better, then they can get a taste of the NFT universe right away…

So in the course of creating it, I looked at the current toolchains – I had worked with Truffle/Ganache before and with Remix often anyway. Now I got to know Hardhat and I liked it right away. So off I went!

After installing Hardhat (plus accessories), I added an IPFS Node so that I could manage the artwork and metadata more comfortably, and Pinata was added as a pinning service. I also took the dashboard from Truffle and my good old friend Metamask as an interface to the blockchains.

To generate the images, I programmed a script in PHP that cuts out parts (shifted) from a large image (source/licence) and inserts the caption.

Generated Images

The Json metadata were also generated with a script and got extended attributes, which OpenSea can show. All this data was then put on the IPFS.

Example for Metadata

The Smart Contract is of course ERC721 compatible, there are enough examples on the web. I added a „burn“ function as well as functions to give each NFT a „dedication“, which is then stored on the blockchain.

Speaking of the blockchain: After some deliberation, I decided to put the NFTs on Gnosis (formerly xDai) and Polygon, as these two chains are a more affordable alternative to Ethereum itself, but with the same range of functions.

After a few evenings, everything was ready and the NFTs deployed (Contract on Gnosis, Contract on Polygon).

Now I still have to please my customers, partners and friends with it. Then I will be available for more cool projects 😉

P.S.: By the way, the Polygon version can also be viewed and traded on OpenSea.

„Blue Skies“ on OpenSea

Addendum: Viewing/managing NFTs on the smartphone is a problem for various apps. But there is also the Minerva Wallet from my Graz-based friends at lab10 collective eG. that does it really well.

Minerva Wallet: Overview of chains, accounts, tokens and NFTs, displaying and sending of NFTs.

Thanks!

Blue Skies NFT (deutsch)

(english version here)

In der letzten Zeit werde ich immer öfter gefragt, ob ich (in meiner Rolle als Blockchain-Consultant) auch NFTs „machen“ kann. Schon vor längerer Zeit habe ich ein paar NFTs auf OpenSea und mintable.app erstellt und kenne die Vorteile, aber auch die Nachteile von solchen Plattformen.  Jetzt wurde es also Zeit, „richtige“ NFTs zu machen. Damit meine ich NFTs mit einem eigenen Smart Contract, wo man selbst alles unter Kontrolle hat und auch Spezialfunktionen einbauen kann.

Da ich kein Künstler bin, lautete meine erste Frage an mich: „Für welchen Usecase also?“ Ich entschied mich für „Give-Away“ NFTs, die ich meinen Kunden, Partnern und Freunden schenken kann. Die meisten von ihnen sind allerdings nicht extrem crypto-affin. Umso besser, dann können sie gleich in das NFT-Universum hineinschnuppern…

Im Zuge der Erstellung sah ich mir also die aktuellen Toolchains an – mit Truffle/Ganache hatte ich schon mal gearbeitet und mit Remix sowieso schon oft. Jetzt lernte ich Hardhat kennen und es gefiel mir gleich auf Anhieb. Also los!

Nach der Installation von Hardhat (plus Zubehör) kam noch ein IPFS-Node dazu, damit ich das Artwork und die Metadaten komfortabler managen kann, als Pinning-Service kam Pinata dran. Von Truffle nahm ich noch das Dashboard dazu und als Schnittstelle zu den Blockchains den guten alten Freund Metamask.

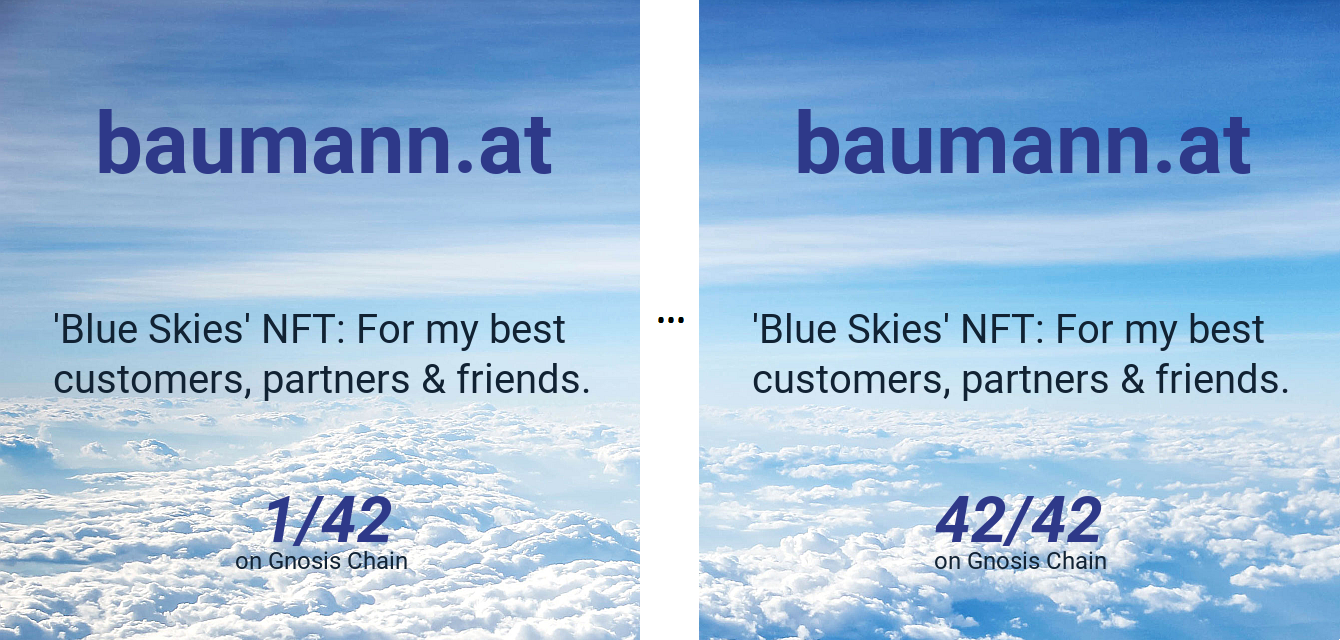
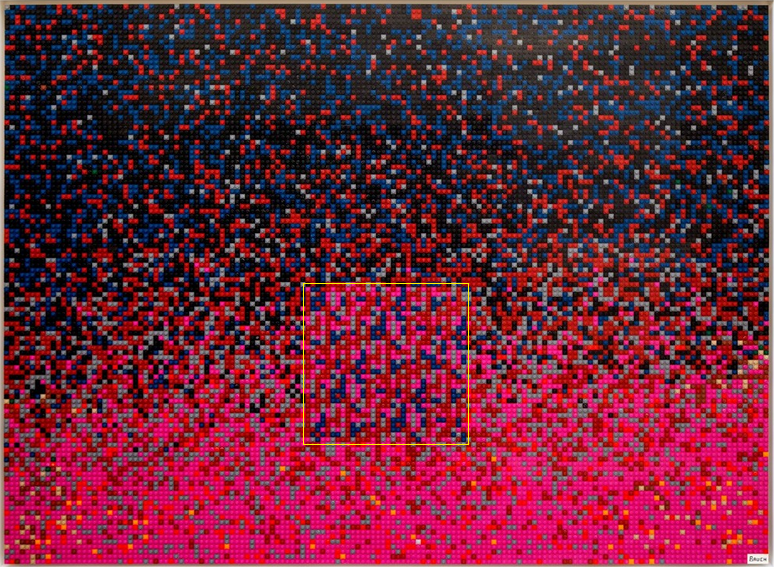
Um die Images zu generieren, programmierte ich ein Script in PHP, das aus einem großen Bild (Quelle/Lizenz) Teile (verschoben) ausschneidet und die Beschriftung einbaut.
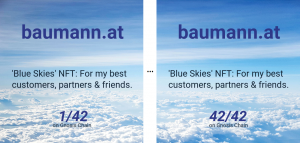
Generierte Images

Die Json-Metadaten wurden ebenso mit einem Script generiert und bekamen auch gleich erweiterte Attribute, die z.B. OpenSea anzeigen kann. Alle diese Daten kamen dann aufs IPFS.

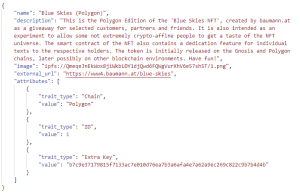
Beispiel für Metadaten

Der Smart Contract ist natürlich ERC721 kompatibel, dazu gibt es im Netz genügend Beispiele. Ich fügte noch eine „Burn“-Funktion dazu sowie Funktionen, mit denen man jedem NFT eine „Widmung“ geben kann, die dann auf der Blockchain gespeichert wird.

Apropos Blockchain: Nach einigen Überlegungen entschied ich mich, die NFTs auf Gnosis (früher xDai) und Polygon zu stellen, da diese beiden Chains bei selbem Funktionsumfang eine deutlich günstigere Alternative zu Ethereum selbst sind.

Nach ein paar Abenden war dann alles fertig und die NFTs deployed (Contract auf Gnosis, Contract auf Polygon).

Jetzt muss ich noch meine Kunden, Partner und Freunde damit erfreuen. Dann stehe ich für weitere coole Projekte zur Verfügung 😉

P.S.: Die Polygon Version kann übrigens auch auf OpenSea betrachtet bzw. gehandelt werden.

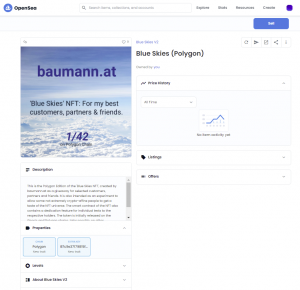
„Blue Skies“ auf OpenSea

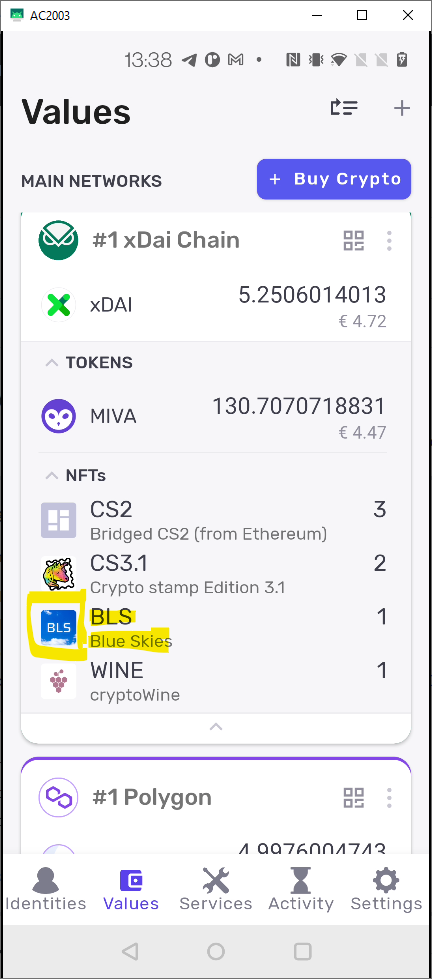
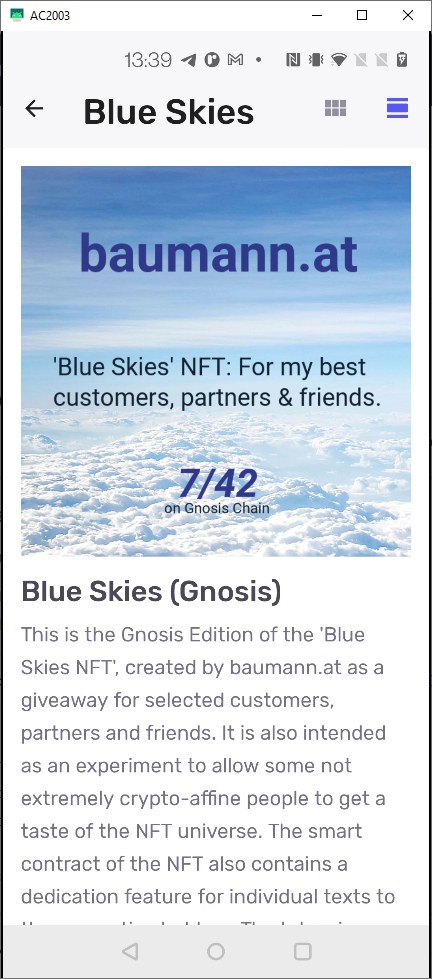
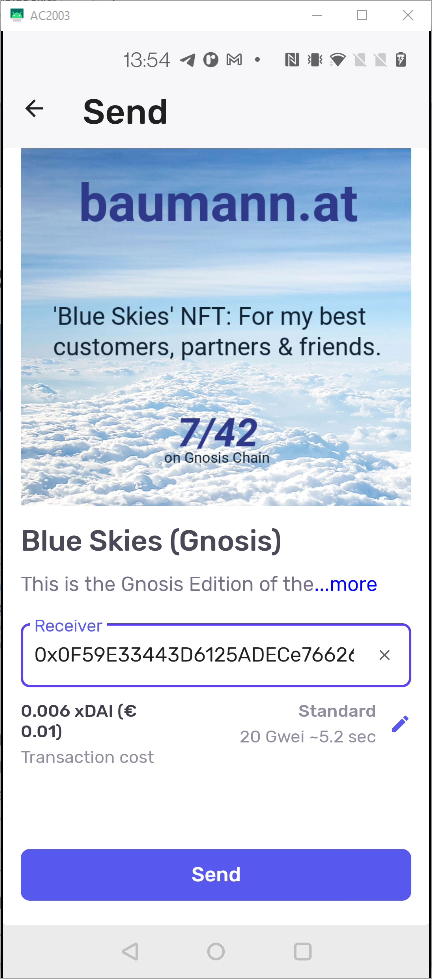
Nachtrag: NFTs am Smartphone zu betrachten/verwalten ist für diverse Apps ein Problem. Aber es gibt auch das Minerva Wallet von meinen Grazer Freunden der lab10 collective eG., das macht das richtig gut.

Minerva Wallet: Übersicht Chains, Accounts, Tokens und NFTs, Darstellung und Versand von NFTs.

Danke!

Crypto-currencies hidden in Lego artworks

Two days ago I read this article in „Klausis Krypto Kolumne“. It is about artist Andy Bauch, who created Lego mosaics with hidden data in it. Decoding the data should lead to private keys for crypto-currencies …

After a little brainstorming I managed to crack the code of the picture Bitcoin Initially Valued at $20, 2016, but when looking up the calculated Bitcoin Address (1NmxAV1ze28U4Uuqg2fH1JTB8NtWKvTyhM) in a Blockexplorer, I had to recognize, that the value was already withdrawn. After googling the decoded private key (S49JAsn794iqvr6sTodXfdf41NCFaD) I found an russian article on medium.com, explaining the decoding process of all the Bitcoin series. Further information I then found here.

So some clever guys had done it three weeks ago and collected Bitcoins worth USD 10.000,- Congratulations!


Parallel to the „Bitcoins“ series Andy Bauch also did some artwork including the private keys for other cryptocurrencies. For example Dogecoin initally valued at $10, 2018.

I played around with it yesterday evening: It is a little more complicated to extract the private key (than in the BTC series) and the gained value is far lower, but the fun is the same …

Here my findings for the Dogecoin picture, after locating the relevant area in the picture (see yellow frame):

The information is coded in Base4, using 4 digits per character
Colors: pink: 0, red: 1, blue: 2, grey: 3

This leads to following 204 digits: 031210221101101013020310101113120312030313101013100211131003031312220302102211211322101012321213121213021100112011201303122110111221101310311301121212231213111313031233101112320320031113111013031011200310

This sequence grouped in four digits, converted to Base10 and interpreted as ASCII gives the 51 character private key: 6JQDr4Ev63tGBWC7j2JYzDngfrPXXsiEiGMqfkgWsoEn85uG4X4

This converts to the DOGE Address: DS94PAd6nxxTWSktgHUKkcxxjotSJoWrCW

As expected, the 1,255.3030078 DOGE (valued approx. USD 10,-) also have been collected on 2018-03-24.

But: Did I mention the fun?

😉

IOTA Full Node

IOTA zählt heute wohl zu den am meisten polarisierenden Technologien am Sektor der Kryptowährungen.

Mit dem anstatt einer Blockchain eingesetzten „Tangle“ sollen IOTA Systeme Transaktionen „blitzschnell“ verarbeiten und dabei „endlos skalieren“. Da es kein Mining gibt, fallen keine Transaktionskosten an und „quantum proof“ (d.h. die Algorithmen können nicht von – irgendwann kommenden – Quantencomputern gebrochen werden) soll das System auch noch sein.

Da werden natürlich Verfechter der „alten“ Kryptowährungen, die auf Bitcoin- bzw. auf Ethereumtechnologien basieren, nervös und reiten auf diversen Eigenschaften von IOTA herum, ibs. auch auf den Skurilitäten, z.B. der Einsatz von ternärer Logik auf „normaler“ (binärer) Hardware oder eine selbsterfundene Hashfunktion, die sich als kryptografische Schwachstelle herausgestellt hatte.

Wie dem auch sei. Ich finde die Technologie jedenfalls interessant genug, um mich damit zu beschäftigen. Also habe ich Anfang Dezember 2017 mal einen Server („Full Node“) mit IRI (der IOTA Reference Implementation) aufgesetzt. War zwar etwas Bastelei (mittlerweilen gibt es gute Anleitungen) und auch das manuelle Suchen und Konfigurieren von „Neighbors“ (Nodes mit denen sich der eigene zu verbinden hat) ist zumindest ungewöhnlich.

Gut, jetzt habe ich also einen funktionierenden Full Node und unterstütze das IOTA Netzwerk. Mein Wallet (Light Wallet unter Windows, Android muss ich noch testen) kann ich auch damit verbinden und IOTA hin- und herschicken. Sehr spannend 😉

Eigentlich würde ich sehr gerne noch ganz andere Dinge damit ausprobieren, z.B. Daten von IOT-Devices verarbeiten (übertragen, speichern, verkaufen …), was ja der eigentliche Hauptzweck von IOTA sein soll. Das ist aber noch nicht wirklich verfügbar, zumindest nicht für die Allgemeinheit.

Aber wenigstens konnte ich einmal das IRI-API anbinden, an eine simple Webapplikation, mit der man den Status meines Nodes beauskunften kann.

Ich bleibe jedenfalls dran und werde über die Verarbeitung von IOT-Daten berichten, sobald es relevante News gibt.

Also: Stay tuned …

Bitcoin Full Node on Raspberry Pi

Last week I bought a Raspberry Pi 3 (model B) to set up a proof of concept of a Blockchain connection to IoT devices (but that’s another story) …

Some time ago I read http://www.raspberrypifullnode.com/ and decided, to give it a try now.
This posting will not repeat everything from David’s article, just the changes from then (2014) to now (9/2017).

Micro SD card: The Bitcoin blockchain has a size of around 145 GByte at the moment, which leaves a 256 GB cards as an option, if you really want to store the complete blockchain …

Operating system: As I didn’t have NOOBS at hand, I downloaded the current version of Raspbian Stretch here and used Etcher to „burn“ the image to th SD card.

During the first boot, I connected a monitor and a keyboard, then configured the WiFi and activated the ssh deamon using

sudo raspi-config

After a

sudo reboot

I had a fully working system, which I could control with Putty (and WinSCP).

Now I followed David’s article, but had to apply some changes due to changes in the Bitcoin source. After updating and upgrading with

sudo apt-get update
sudo apt-get upgrade


I installed the dependencies …

sudo apt-get install build-essential autoconf libssl-dev libboost-dev libboost-chrono-dev libboost-filesystem-dev libboost-program-options-dev libboost-system-dev libboost-test-dev libboost-thread-dev libtool libevent-dev

… and then downloaded the current version (branch 0.15) of the Bitcoin source:

mkdir ~/bitcoin
cd ~/bitcoin
git clone -b 0.15 https://github.com/bitcoin/bitcoin.git
cd bitcoin/

The building took „some“ time …

./autogen.sh
./configure --disable-wallet
make
sudo make install

… but in the end everything was OK.

Remark: I chose to build the node with –disable-wallet, as I did not care to run a wallet on the system. See the discussion here concerning Berkley DB 4.8 and incompatible wallet formats …

After starting the deamon with

bitcoind &

it started to connect to other nodes and sync the blockchain …

Voilà – all up and running 😉

WalletGenerator erweitert

Der universelle Generator für Walletadressen, Paper-, Bulk- und Brainwallets von WalletGenerator.net kennt jetzt auch die Parameter meiner Kryptowährung C2coin.

WalletGenerator.net mit C2coin Erweiterung

Der erweiterte Generator kann nun Wallets für 130 Kryptowährungen generieren und ist zu finden unter http://coinz.at/walletgenerator/.

Die Version ist ein Fork von https://github.com/MichaelMure/PaperWallet/archive/master.zip

coinz.at – Umstieg auf uNOMP

Die bisher bei coinz.at verwendete Pool-Software Stratum-Mining ist ja schon etwas in die Jahre gekommen, daher wurde der DEM-Pool auf die moderne Lösung uNOMP umgestellt.

coinz_at_20161118

Basis für uNOMP ist ein node.js Server und eine Redis No-SQL Datenbank, das System läuft seit einigen Wochen problemlos und hoch performant.

Update 11/2016: Das Tempo der Entwicklungen in diesem Sektor ist enorm! uNOMP gilt seit 10/2016 als „deprecated“ und wird durch „node merged pool“ ersetzt, coinz.at wird also demnächst wieder upgedated …

Webshop mit Coinbase Payment

Um die Frage zu beantworten, wie (einfach?) es geht, einen Webshop mit Bitcoin-Payment auszustatten, habe ich folgendes Setup erstellt:

Zuerst habe ich auf einer WordPress-Installation das beliebte eCommerce Plugin WooCommerce installiert und ein paar Produkte angelegt.

Als erste Methode soll eine Bitcoin-Zahlung über den Paymentprovider Coinbase eingerichtet werden. Dazu ist das Coinbase-WooCommerce Plugin zu installieren, was auch problemlos funktioniert – cURL muss dazu am Server installiert sein.

Danach ist noch die Konfiguration von API-Key und Secret durchzuführen (WooCommerce – Einstellungen – Kassa – Coinbase) – siehe Screenshot.

ws_coinbase_config

Und das war es auch schon. Die Payment-Methode „Bitcoin (via Coinbase)“ erscheint automatisch in der Auswahl der angebotenen Bezahlmethoden.

ws_coinbase_1

Eine Bezahlung mit Bitcoin verwendet den üblichen, bekannten Coinbase Dialog …

ws_coinbase_2

… und der Status des Bezahlvorganges (OK oder Abbruch/Timeout) wird dem Webshop über das Plugin online zurückgeliefert.

Parallel dazu werden die bei dem verwendeten Coinbaseaccount konfigurierten Notifys (e-Mail und/oder Callback) durchgeführt.

Zusammengefasst: EInfache Installation und Konfiguration des Plugins, das Bitcoin-Payment über Coinbase ist sofort einsatzbereit.